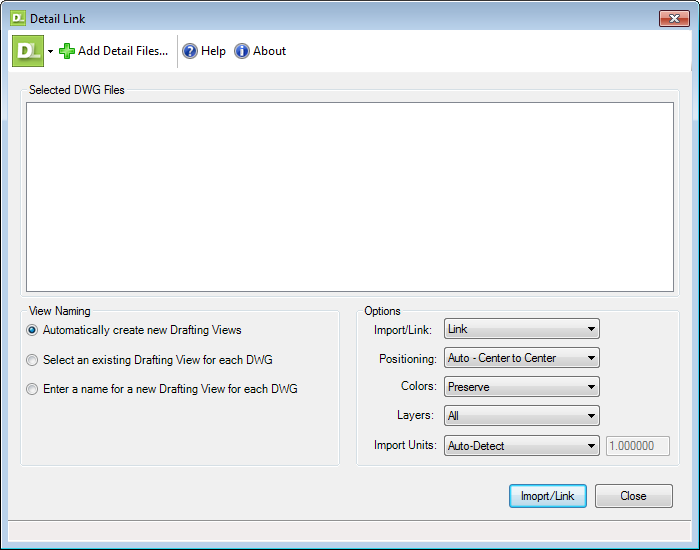
Detail Link
Save Time By Automating
Automates the process of linking AutoCAD DWG details for use in the Revit project environment.
Key Features
Dwg group
Files
- This method allows a user to select specific files to link into Revit from a folder location
Folder
- The folder method will use a folder and all sub-folders to link in a series of DWG files.
- Users should be prompted if they want to recursively search subdirectories if they exist.
VIEW NAMING GROUP
By File Name
- Will automatically name new drafting views according to the file name.
- The file extension will not be included in the name
Custom for Each
- The user is prompted for each file to specify a new drafting view name
- Status text should show the current file that will be linked in
Custom Name Increment
- User specifies a basic name and the program will create views incremented from the basic name
Place in Existing Views
- The user is prompted for each file to be linked and into which view they want the file to be linked
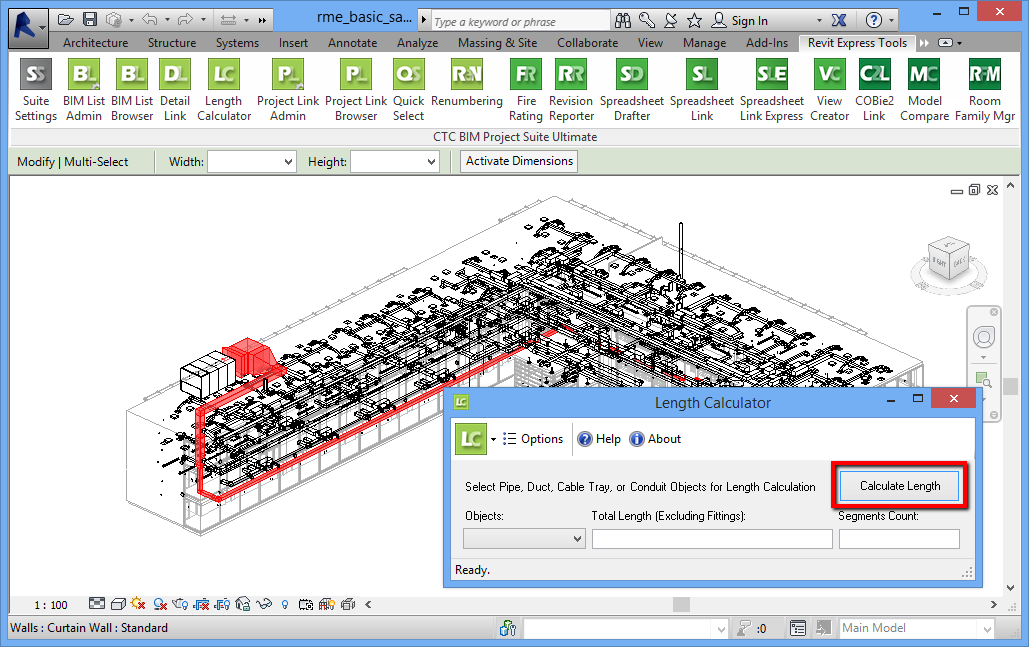
Length Calculator
About Length Calculator
A Revit add-in designed to assist during the design phase of duct, pipe, conduit or cable tray layout by quickly calculating the length of a run.
The Pain Point
Older versions of Revit do not calculate how long a duct or pipe run
is without the user having to go in and calculate each piece.
Key Features
Quickly calculate a run length by selecting the elements in a run.
Also generate an accurate segment count in the selected
run.
Intended Audience
-Everyday Revit users
-MEP users
Competitive Advantage
Tells you how long a duct or pipe run is without you having to calculate each piece.
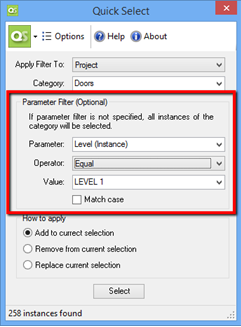
Quick Select
Enables Specific Selections
A Revit add-in that selects elements by filtering specific categories or parameter values. Searched elements that match filter criteria can either be added to, removed from or replace the currently selected items.
Key Features
It may be desirable to refine a selection with more granularity than can be achieved by a single pass through the Quick Select interface. If additional filtering is needed, Quick Select can be run as many times as needed, each time taking the previous selection and modifying it by either adding or removing elements.
Selecting Elements
The first step in using Quick Select is to decide how to apply the filter. Quick Select has the ability to build a new selection, add to an existing selection, remove items from an existing selection, or replace the current selection altogether.
Options
The three options in the “Apply Filter To” dropdown are listed below and determine which elements will be considered in the selection filter.
- Project – All elements in the active project
- Active View – Only elements from the Active view
- Current Selection – Only elements in the current selection
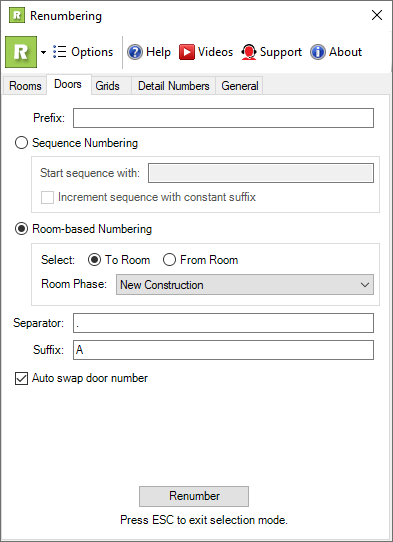
Renumbering
Provides a fast and simple way to renumber your rooms and doors. Auto-swapping avoids duplicates. Alphanumeric sequential numbering is supported. Add separators and suffixes to room and door numbers.
Numbering Rooms
To number rooms, enter a room number in the “Start sequence with” textbox. The sequence can be alphanumeric but should always end with a number if no suffix is specified. The “Suffix” textbox can hold a single letter or a number. The “Separator” and the “Suffix” fields are optional; however, it is required to have a suffix if a separator is defined.
Numbering Doors
There are two ways to number doors, either utilizing sequential numbering or using the “To Room” and “From Room” properties of a door. By default, the sequential door numbering option is selected. For sequential door numbering, enter a number in the “Start sequence with” textbox and check the “Auto Swap” checkbox, if you want to automatically swap the door number to avoid duplicates. Finally, click the “Start” button to select the doors from the active document. The number entered in the “Start sequence with” textbox will increment by one on the selection of each door. Remember, only numeric values are allowed for the sequential door numbering.
Revit Properties
Displays Revit File Information
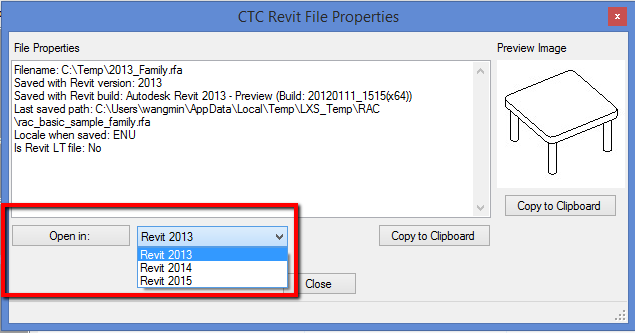
Unlike the other tools in BIM Project Suite, Revit Properties does not actually run within Revit. Instead, it modifies the Windows Explorer / File Explorer interface to provide access to basic data about Revit project files, family files, project template files and family template files, and lets you open those files in the installed version of Revit you choose.
Key Features
The free Revit Properties tool in CTC’s BIM Project Suite modifies the Windows Explorer / File Explorer interface to quickly provide access to basic data about Revit files by simply right-clicking on them and selecting the “Revit Properties” choice from the Explorer pop-up menu.
Revit Properties will show you information about the Revit file, including the version of Revit last used to save the file, and also things like worksharing information.
Only versions of Revit that are installed for the same or later version of Revit that last saved the file will be on the list of choices.
Revit Properties will let you “Create New Local” from a central file in the same manner that Revit does, however it cannot open a project “Detatched from central” nor can it allow you to choose which worksets to open, or to open the file with auditing turned on.
Even with those limitations, it’s still a very handy free tool!
View Aligner
Overview
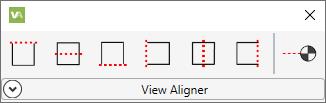
Revit’s native view alignment can be a little frustrating. There are very few alignment points, and rarely are they useful for views. Instead of the basic drag alignment, View Aligner allows explicit Edge, Center and internal level alignment across multiple views. This works both on a single sheet, and across multiple sheets. Streamline sheet assembly with this simple free tool today.
Key Features
- View Aligner offers effortless alignment of views on a sheet
- Provide easy workflow to align views across multiple sheets with only a couple mouse clicks
- Enables alignment of views, schedules and text on sheets
- Use the levels in views to align views by level objects instead of view borders
Fab Sheets
Fabrication Documentation Process
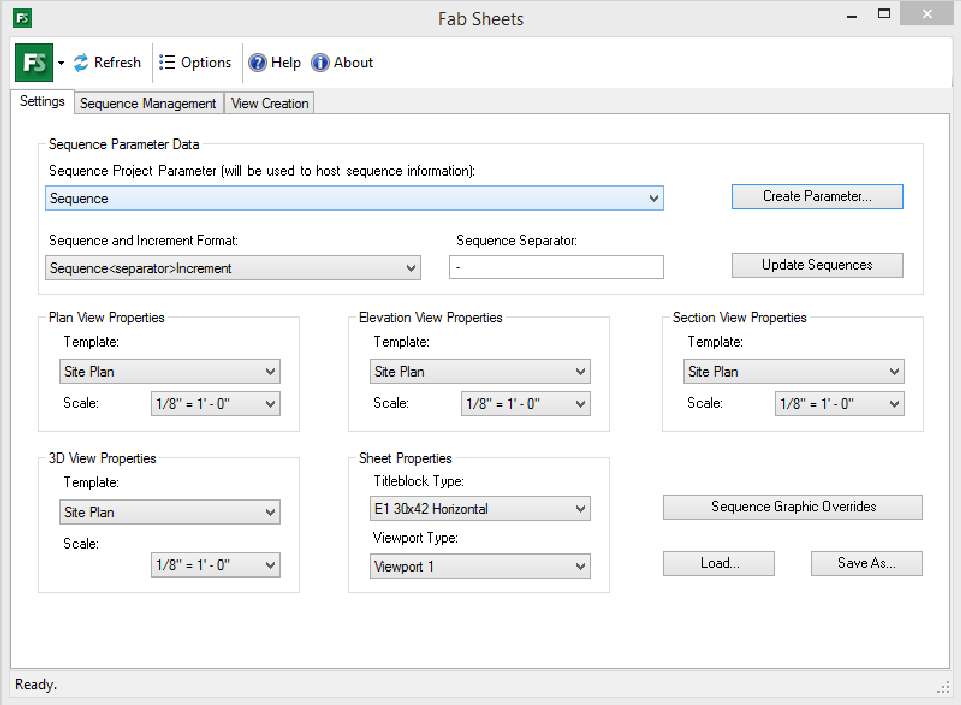
Group elements by a parameter value, create scope boxes for each group, generate views based on the scope boxes and then place the views onto sheets.
The Pain Point
There is certainly no “easy button” for creating, naming and managing views for fabrication in Revit. With all the view names, filters, sheets and settings required to get things right to produce construction-ready documents it is easy to miss something along the way.
Key Features
Manage view settings
The settings dialog is used to configure parameters, view templates and filters that drive the graphic output of the views.
Graphical grouping
Adding custom colors makes it easy to assign elements to groups. Fab Sheets builds and maintains filters that color code elements as they get assigned.
Fire Rating
Create Life Safety Plans
Fire Rating has tools to assign values to the fire rating property, map line types to each fire rating and generate graphics for plan views.
Key Features
Mappings
The “Mappings” tab is used to tie existing Revit line styles and/or wall tags to the “Fire Rating” property values that exist within each project. For each “Fire Rating” property, there will be a dropdown box to select an existing line style and another dropdown box to select an existing wall tag. These mappings will be used to generate the graphics as described on the next tab.
Generating graphics
Once fire ratings and mappings have been defined, graphics can be generated using the “Graphics” tab. On the left side of the “Graphics” tab, a tree view displays plan views from the active Revit project. Select the views from the tree for which graphics should be generated.
Graphics maintenance
Generated graphics are static and will not automatically update if the model changes. To keep graphics in sync with current model geometry, the “Update Graphics” or “Remove Graphics” buttons can be used. Graphic updates or removal are based on a set of rules in the “Options” dialog.
Invisibility Advisor
Common Challenges
- Revit users may spend 2-4 hours a week on average resolving object visibility issues
- Revit has nearly 60 different ways to control object visibility
- New and experienced Revit users rarely remember to check all the ways before asking for help
- Often invisibility can be controlled by multiple compounding factors
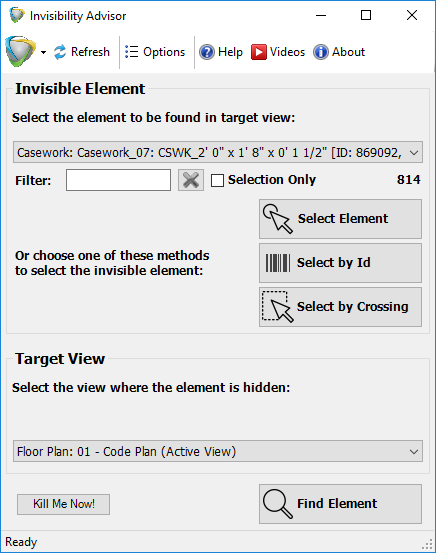
Solution – Invisibility Advsior
- Invisibility Advisor can discover the actual factors affecting an object’s invisibility
- Advice is offered to assist with understanding why the object(s) were not visible
- In many cases, an instant ‘Fix’ option is available to resolve the visibility issue
- The Invisibility Advisor can remain on screen while you work, so visibility solutions are available at your fingertips
Return on Investment Realized
- At $65/hr billable, this can easily equate to $6,700- $13,500/year/user in manual visibility resolution workflows
- • At even 1 hour per week time savings, Invisibility Advisor can save an average firm $3400/year/Revit user
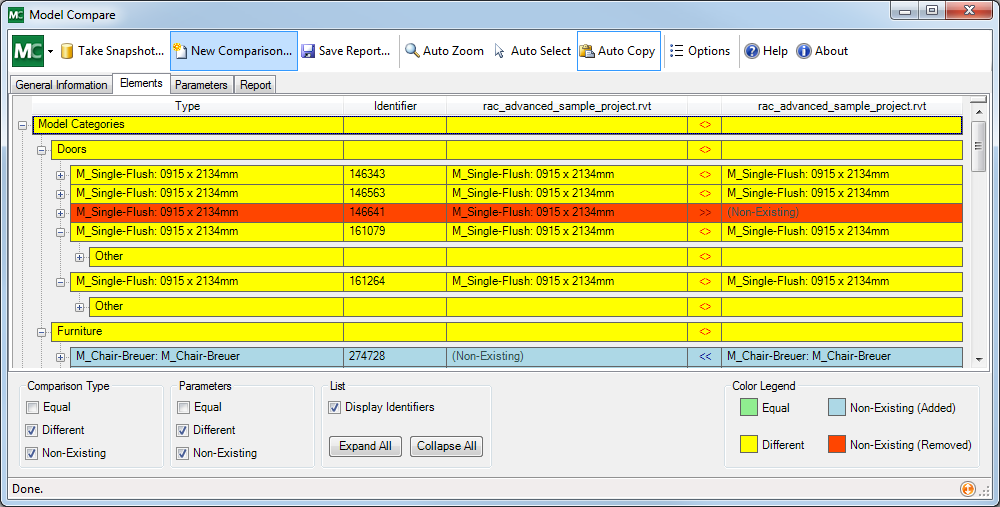
Model Compare
Compare Project Versions
Model Compare is used to compare two Revit files or the same Revit file at 2 different points in time, to identify differences. It works by taking “snapshots” of Revit files, which are then used to generate comparison results. By utilizing snapshots there is no need to retain full copies of Revit files as a project progresses. Snapshot files are self-contained and small by comparison to a Revit model.
Key Features
Taking snapshots
The most effective use of Model Compare is to take snapshots of desired Revit files. The comparison between two snapshot files is based heavily on Revit element IDs, which would vary from project to project. Periodic snapshots can be used, for example, to identify what changes are being made within a project over the life of the project, or to identify changes made by consultants.
Auto zoom, select & copy
When the Auto Zoom button is enabled, Model Compare will automatically zoom in on the location of a model element within the Revit when that element is selected from the comparison results.
Report
The report function gathers all the information from the comparison results and puts it into a spreadsheet format.
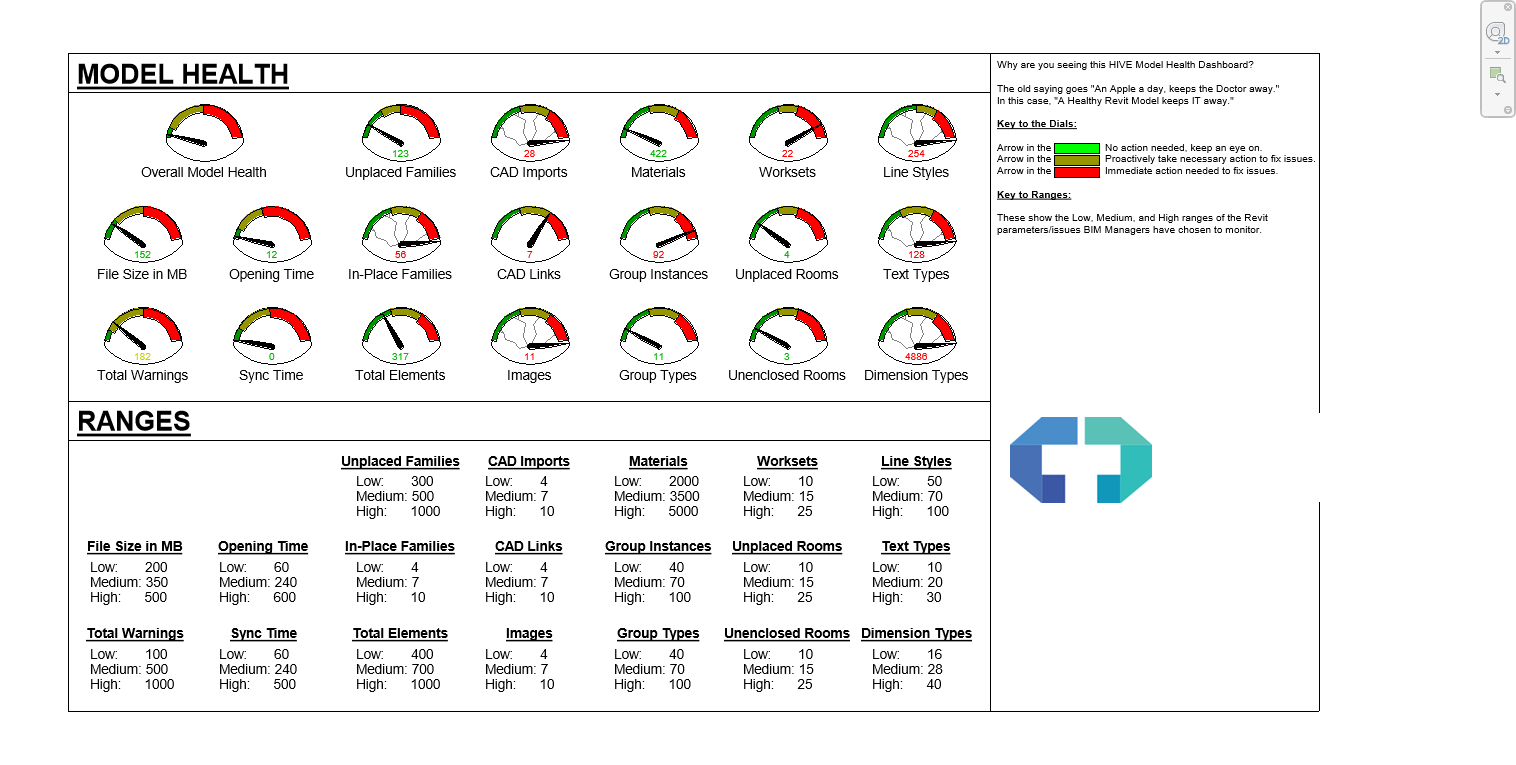
Model Dashboard
In-model analytics dashboard for Revit project models
The Pain Point
Over time and during development, Revit models can accumulate performance degrading objects and data. In addition, sub-optimal modeling practices contribute to this degradation. Getting users to pay attention to these performance killing situations can be difficult.
Key Features
Starting View Analytics Visibility
Place the provided titleblock family on your starting view to call attention to the vitals of your Revit project model. High visibility means more users take notice of their model’s health.
Easy to Add and Customize
The provided titleblock can be used as-is or customized. When the titleblock is inserted in the model, it comes with custom parameters that the addin uses to store the model stats. Use these parameters to display your own visuals or decide which should be highlighted.
Gathers Most Useful Metrics
The Model Dashboard includes many helpful stats such as:
- Open and Save times
- Quantities of placed and unplaced/unused Revit objects
- Total warnings
- File sizes
- Linked elements
- Worksets
- Text types, line styles, dimension types
Early Warning System
Because the Model Dashboard is so easy to use, it can help you spot problems beginning to develop before they become show-stoppers. Once the titleblock is added to a model, it runs in the background with no user input required.
Occupant Flow Analyzer
When calculating room occupancies and egress pathing, we typically have to resort to manual data entry and tools outside the Revit model to provide the required analysis and calculations. To avoid unnecessary steps, CTC’s Occupant Flow Analyzer can run the calculations and generate egress pathing live in the Revit model, to greatly streamline these code calculation tasks.
The Pain Point
Working with Revit can sometimes produce frustrations when all you want is a simple calculation. Room occupancy is often one of those areas. Revit has many ways to handle that, but none of them allow you to practice real BIM. Following that, we have to intelligently analyze the paths building occupants need to take to safely exit the building, making certain that paths fall within local code limitations. This egress analysis needs to account for building partitions, impassable objects, vertical circulation and points of egress. To date, most of these tools run externally from the Revit environment, causing disruption to the design process, when rapid design iterations are needed.
Key Features
Rules based occupancy
Revit and its rounding engine are not always in-line with our needs. Perhaps you need to round by level, by smoke compartment or by some other rule that is custom to your firm. Revit doesn’t necessarily support these rulesets natively. The Occupant Flow Analyzer allows you to specify the rounding rules to ensure you have the correct loads on each room in each egress zone.
Rules based egress targets and load factors
Target selections can be made by the family, family type, or by instances. Once selected, the quantity of people that can pass through that egress point can be either specified or calculated based on factors and parameter values. This provides incredible flexibility in calculating compliance at egress points.
Rules based path analysis
The path an occupant must take to exit the building is produced by many factors. Where are the walls, railings and immobile furniture? Where are there trip hazards like chairs and other interior decoration items? These can all be included or optionally excluded when running egress path analysis.
Scope options
Perhaps a user wants to calculate the travel path from one point to another in the building, or perhaps the entire building needs to be calculated for egress path compliance. The Occupant Flow Analyzer can be used for simple, single path travel or for entire building analysis.
Parameter Jammer
The Family Processor for Everyday Revit Users
Are you using Revit content from manufacturers or sources like BIMObject? Do you, or anyone at your company, struggle with getting your family content to schedule properly?
The Pain Point
Downloaded Revit family content frequently introduces shared parameters into the project that are different from the parameters used in your schedules. These differences cause schedules to display incomplete information.
Key Features
Replaces parameters in the family with the shared parameters from the schedule
With a two-step process to swap the parameters in the family, you can carefully reconcile the differences between the parameters used without destroying existing data.
User friendly
Designed so that Revit users who are unfamiliar with the family editor can successfully prepare a family to be scheduled.
Fast jamming
Manually resolving inconsistent shared parameter usage can be a time consuming task. Parameter Jammer automates as much of the process as possible to save you time.
Two-step approach
The first step automatically swaps parameters that can be safely identified as a match. The second step allows you to map, add or omit parameters that could not be automatically swapped.
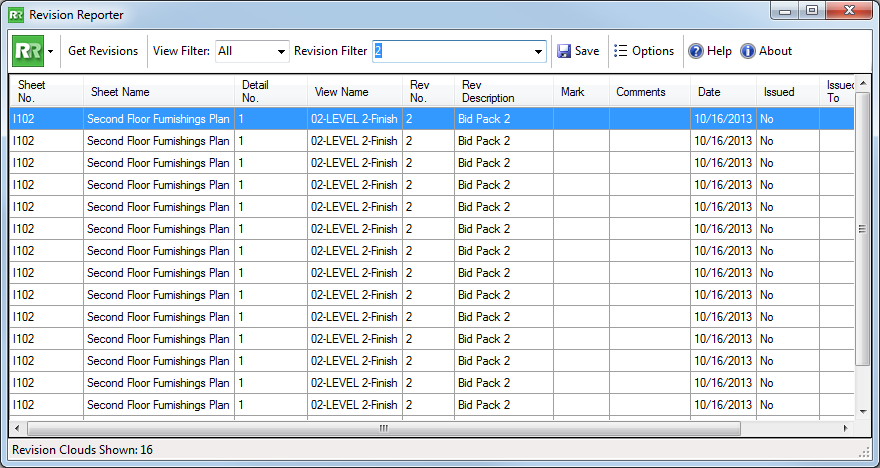
Revision Manager
Easily Export Revision Information
This tool lists revision information, including view and sheet associations, and allows the results to be saved to a spreadsheet file. It also identifies which parts of a model were affected by a revision, and validates that revision best practices are being followed.
Key Features
Filtering
To view by revision location, click the “View Filter” drop down menu. The revisions can be filtered to only show those which appear on views, on sheets, or all revisions. All is the default option. To view only a specific revision number, click the “Revision Filter” drop down menu and select the desired revision number.
Saving
The data can be saved to .XLSX, .XLS or .CSV file formats. Choose the format from the “Save as Type” drop down menu.
Options
In the options dialog, the “Validate Issue Dates” option will validate the content of the “Issued” field to verify it is a proper date. This is useful if the revisions are to be sorted by date, as the validated issue date understands how to properly sort year and day information.
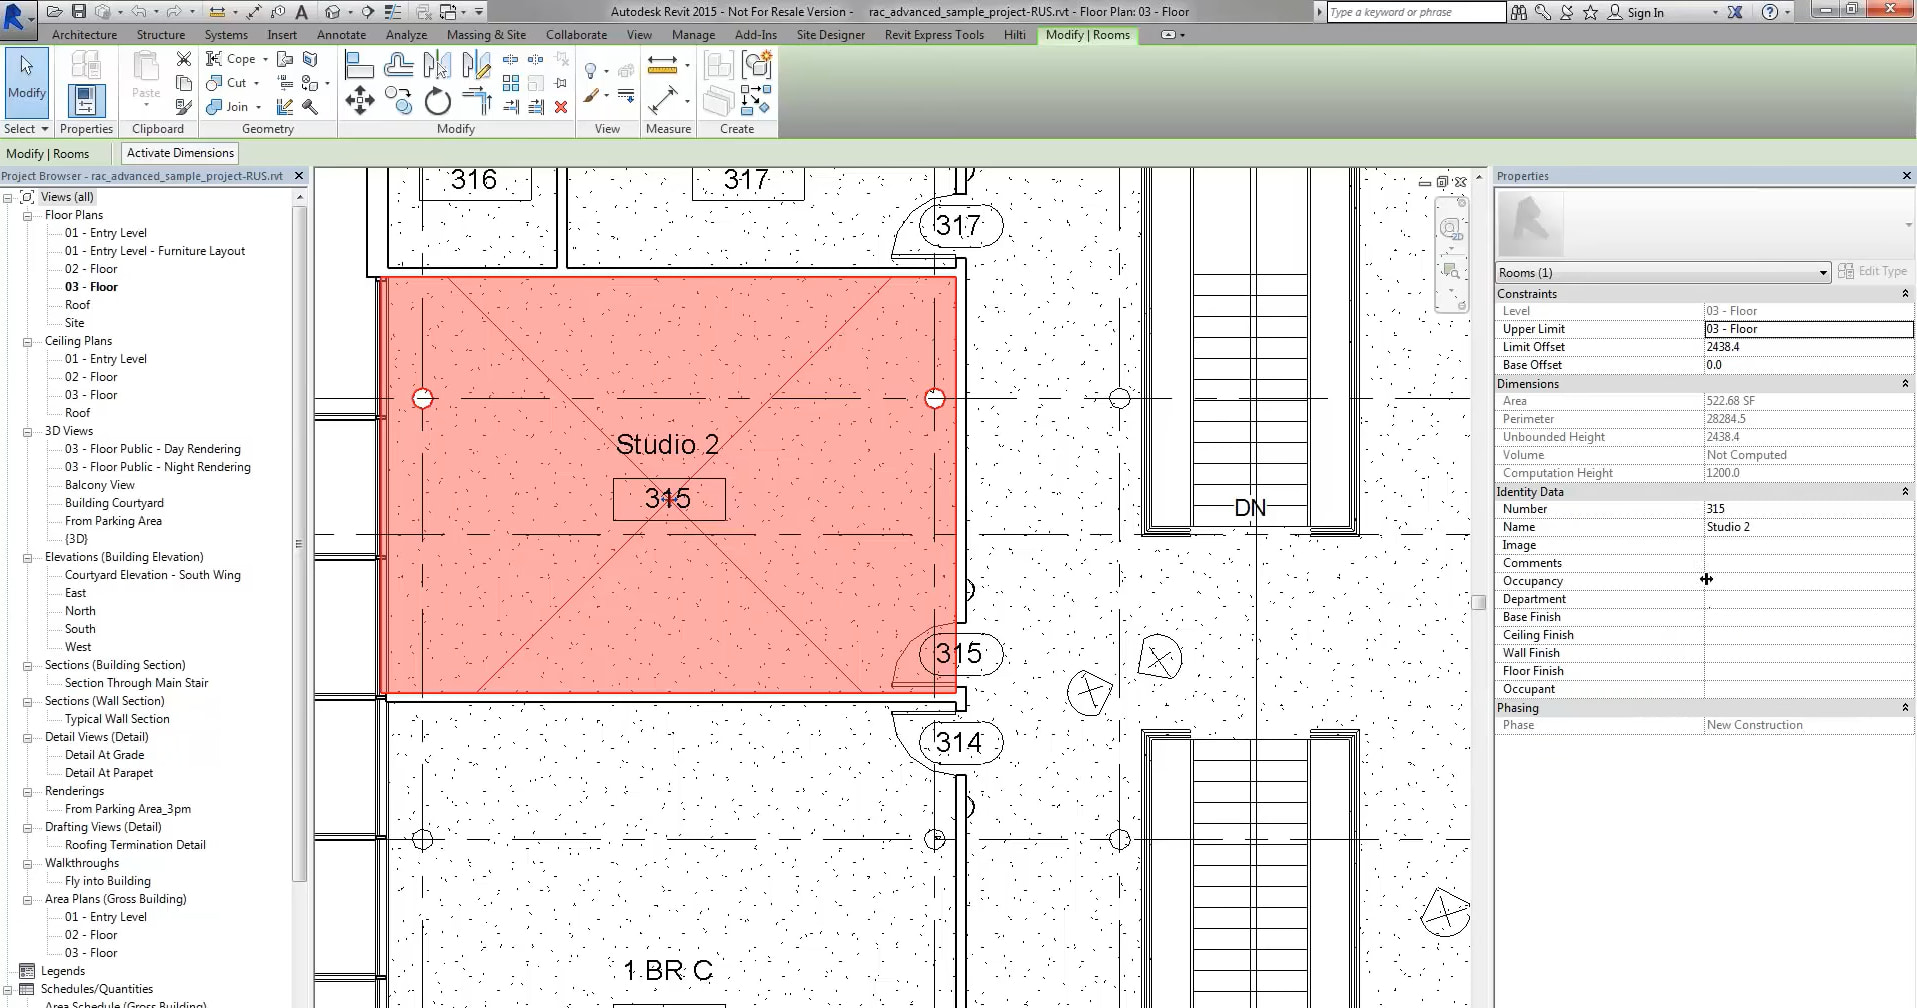
Room Data Sheets
Common Challenges
- Documenting important design information for each room and space such as finishes, fixtures, equipment, and furniture
- Time consuming process of creating all view types, schedules and sheets required by the project
- Producing documents in an efficient and consistent manner
- Managing hundreds of sheets containing room and space data throughout the project
Solution – Room Data Sheets
- Use for room and space object data collection
- Generates 3D, Plan, Reflected Ceiling, Elevation, Schedule and Legend views
- Control naming, order, placement and presentation of views on sheets
- Preview sheets to be created and adjust spacing, size and scale
- Save and load settings of previous configurations
ROI
- Spend less time on repetitive tasks associated with creating room and space views
- Minimal setup: leverage existing title blocks, view templates, schedules and legends
- Consistent, directed workflow ensures accurate and efficient results
- Flexible enough to use on Revit projects of all types, sizes and disciplines
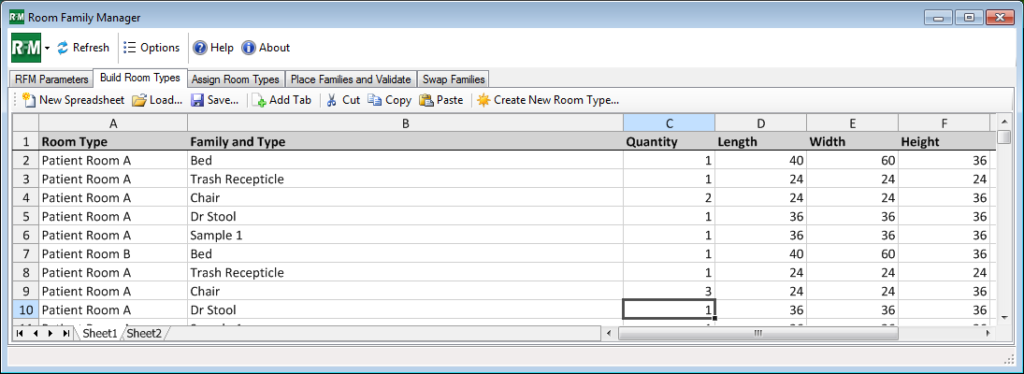
Room Family Manager
Manage Family Content with Ease
Room Family Manager enables defining, maintaining, and validating the family content of each room type definition.
- Build room type definitions in a spreadsheet
- Build room type definitions from existing Revit rooms
- Automatically place family content in your model based on room type assignments
- Validate that rooms in your model contain required families
Key Features
Build room types
A room type, as it pertains to Room Family Manager, defines a specific list of families that must exist in a room. Room type definitions are built in a spreadsheet using a specific format. The spreadsheet workbook can have any number of sheets defined to help organize the room type definitions. Each sheet can have any name, because Room Family Manager will always use all sheets in the workbook.
Assigning room types
Room type assignments are what bind the room type definition to room objects in the Revit model. This assignment is accomplished on the “Assign Room Types” tab in Room Family Manager. On this tab, all of the room objects in the Revit model are listed. Next to each Revit room is a list of the available room types.
Swap families
Placeholder content may eventually need to be replaced with more specific content. The “Swap Families” tab facilitates this replacement on a per-room-type basis.
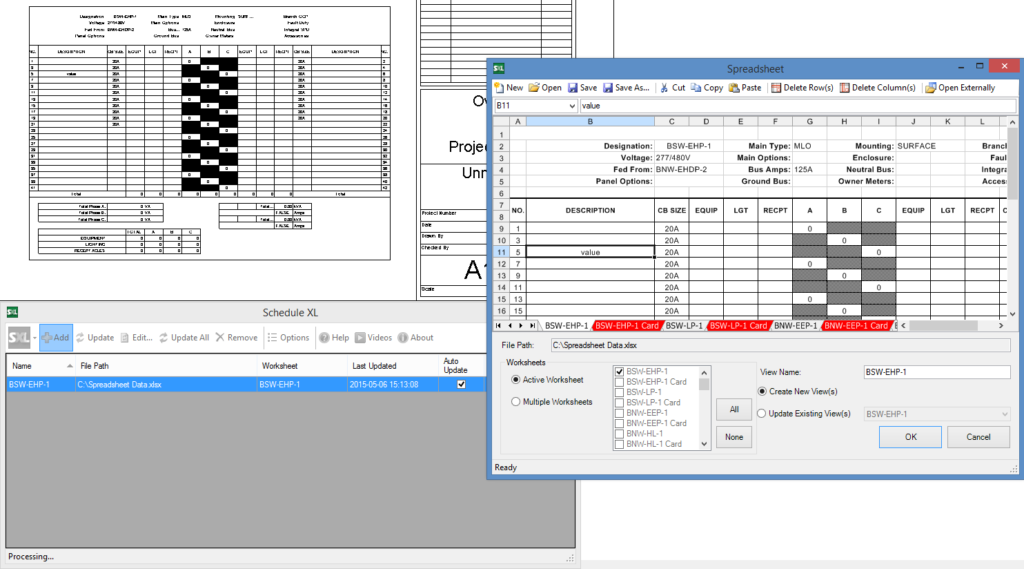
Schedule XL
Schedule Creation from Spreadsheet Data
Schedule XL allows you to create schedule views from one or more worksheets in one or more spreadsheets.
The Pain Point
Including data from sources outside of Revit into sheets for printing is very difficult.
Key Features
Multiple worksheets supported
Schedules can be created from multiple worksheets sourced from one or more spreadsheet files.
Updating of schedules
Schedule XL can update the schedule views when the original spreadsheet has changed.
Automatic updates
Schedules can be configured to automatically update when the Revit project is opened if the original spreadsheet has changed.
Sheet Assistant
Automated Sheet Creation and View Placement
Sheet Assistant places views on multiple existing or new sheets and aligns them according to specified layouts or templates.
The Pain Point
Creating dozens of sheets with similar layouts and characteristics is a time consuming process.
Key Features
Repeatable and Fast Sheet Production
Specify a source sheet or a previously saved configuration to produce sets of plans, elevations, details and more. Maintain consistent view placement across multiple sheets.
Update Sheets with More Accurate View Placement
Use Sheet Assistant to bring consistency to sheets previously created manually.
Standardize Common Sheet Types Across Multiple Projects
Create layout configurations that others can use to set up sheets for all of the organization’s projects and disciplines.
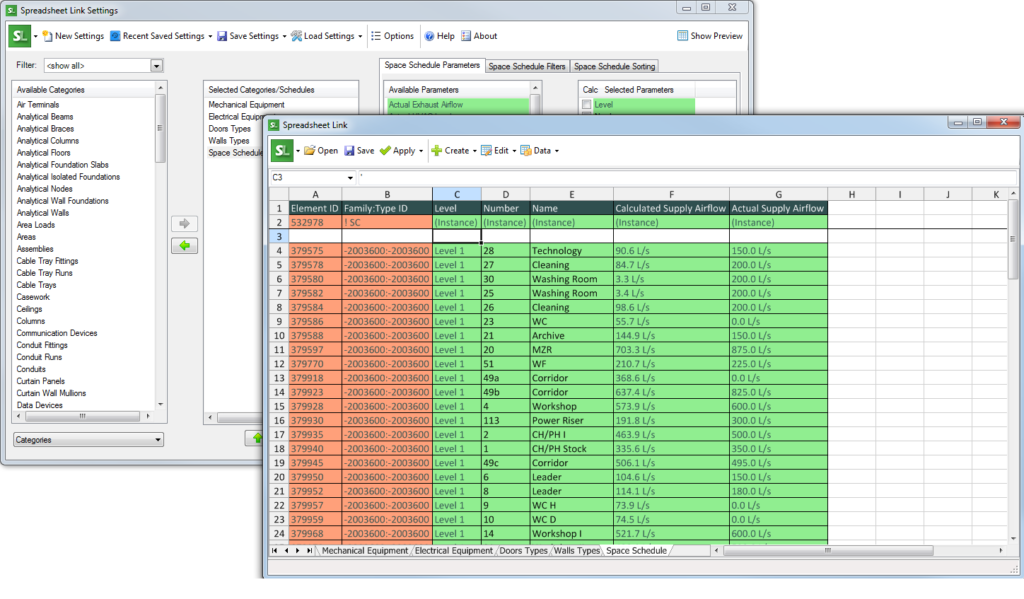
Spreadsheet Link
Bi-Directional Spreadsheet Linking
Spreadsheet Link exports data from Revit elements to a spreadsheet where the data can be edited and then imported and applied back in to the Revit model.
The Pain Point
While Revit is great for drawing buildings and retaining information, it’s not so great at manipulating large amounts of data.
Key Features
Adding categories & parameters
The settings dialog is used to configure the category, parameters and filters that dictate which Revit elements should be included in the spreadsheet for editing.
Calculated values
Modify information with the use of formulas in the spreadsheet export environment.
Working with multiple categories
Adding additional categories will cause corresponding tabs to be built in the spreadsheet window in real-time.
Type parameters in the spreadsheet window
Export and edit both instance and type information together in the same spreadsheet.
Building the spreadsheet from schedules
Ability to source the category, parameters and parameter order from an existing Revit single-category schedule.
Exporting types
The type export function will export the type definitions for a particular category whether or not there are instances defined in the project.
Exporting & opening files from spreadsheet link
Exporting data from Revit to a spreadsheet allows staff that either doesn’t have Revit or doesn’t know Revit to be utilized as part of the design process.
Creating new elements
Ability to create new unplaced rooms, spaces, areas, zones and sheets.
Spreadsheet Link Express
This Revit add-in automates the Spreadsheet Link tool using previously-saved settings.
- Quickly reapply mass change settings to a project, using Spreadsheet Link’s calculated parameters
- Load settings from a file, or right from the project itself
- Spreadsheet-experienced users can define settings, less experienced users can apply them to the Revit project
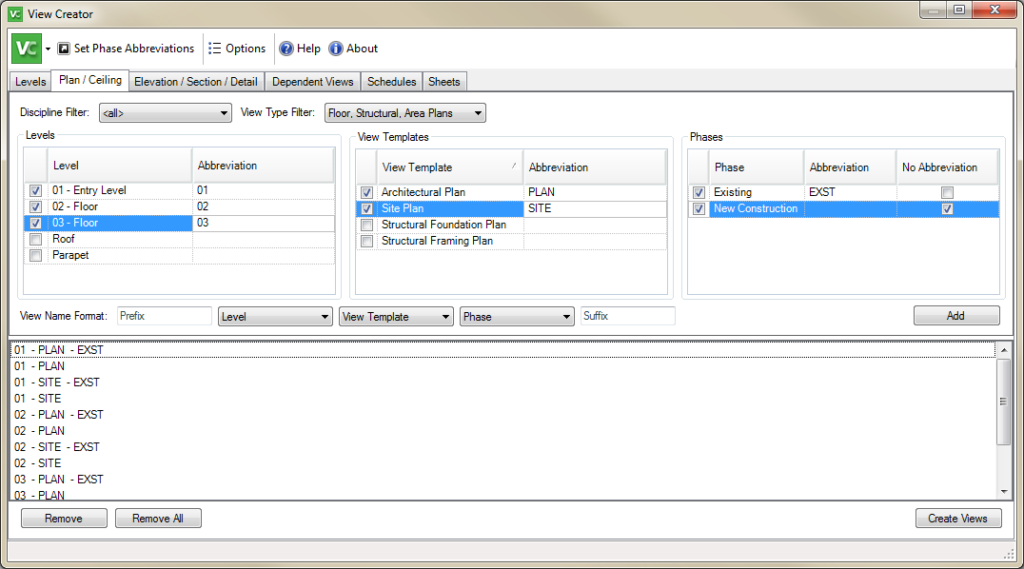
View Creator
Easily Create and Manage Views
This Revit add-in enables users to quickly and consistently create views in their projects. Create plan and reflected ceiling plan views by selecting combinations of levels, view templates and phases.
Key Features
Plan & ceiling views
Create floor plan and reflected ceiling views by selecting a combination of level, view template and phase.
Elevation, selection and detail creation
Ability to copy an elevation, section or detail view from one phase to another.
Dependent views
This tool supports a dependent view workflow based on the use of scope boxes. Create a scope box for each area of a building that will require a dependent view.
Schedules
Duplicate schedules by phase or per level.
Sheets & title blocks
View and control title block usage across the sheets in a project. Each sheet in the current project is represented on a row.
Worksheets
The main function is to allow creation of new 3D views that each display a single selected workset.
Duplicate views
Ability for mass/repetitive duplication of multiple views.
View name separator
Control the characters that are inserted between name parts for any view created by this tool.


 Detail Link
 Length Calculator
 Quick Select
 Revit Properties
 Fab Sheets
 Fire Rating
 Invisibility Advisor
 Model Compare
 Model Dashboard
 Occupant Flow Analyzer
 Parameter Jammer
  Revision Manager
 Room Data Sheets
 Room Family Manager
 Schedule XL
 Sheet Assistant
 Spreadsheet Link
  View Creator