Table of Contents
Nexus Content Management Libraries
This section of the guide includes providing access and management roles to other users.
Accessing the Nexus Portal
Most of the administrative tasks are performed within the Nexus portal. The portal is our centralized web application for administration and analytics. A CTC account is required to access the portal. This account is used by all CTC products that require log in credentials for their use.
Using a web browser (Chrome or Firefox are recommended and supported), follow this link to the Nexus Portal and use the credential provided to your organization for log in.
In order to perform all of the management functions for the content management system, the CTC account must have a minimum role of CMS Admin.
Roles and Permissions
Roles for CMS can be assigned to groups or by individual account. All role assignments are done in the portal.
CMS Admin
- Can add and remove libraries, content and tags for entire organization
- Can set up access for groups and users
- Can assign library manager, contributor or consumer role for groups and users to libraries
- Can invite external users as managers, contributors or consumers to libraries
- Can view all CMS analytics for the organization
CMS Admin role is assigned in the USERS AND GROUPS area at the organization level
Manager
- Can upload, update and remove content for libraries they manage
- Can use and download content from libraries for which they have been granted access
- Can write reviews on content in libraries for which they have been granted access
Contributor
- Can use and download content from libraries for which they have been granted access
- Can write reviews on content in libraries for which they have been granted access
Consumer
- Can use and download content from libraries for which they have been granted access
Creating Libraries
Libraries can be considered a collection of groups and users. This may seem counter to the traditional definition. This is because content within Nexus is not contained in any library; rather, content is associated to one or more libraries so that access to it can be granted by the library itself. Therefore, a library is a list of users and groups as well as references to content. Because a content item can be associated to more than one library, it is more easily tracked and managed as this eliminates the need for duplication of files and data.
There is one exception to the above rule, however: if enabled for your organization, a library can become siloed. A silo library creates singular copies of any content item contained or uploaded to it. Content cannot be processed into or belong to more than that single silo library. Siloed content presents some unique management challenges so, it is provided only by request. If your organization requires this functionality, you can request it through CTC support. When enabled for your organization, while editing or creating a library, there will be an option to enable it as a silo and whether it should also be included in the logged data.
Library Creation Using the Portal
Navigate to the CMS->Manage Libraries area.
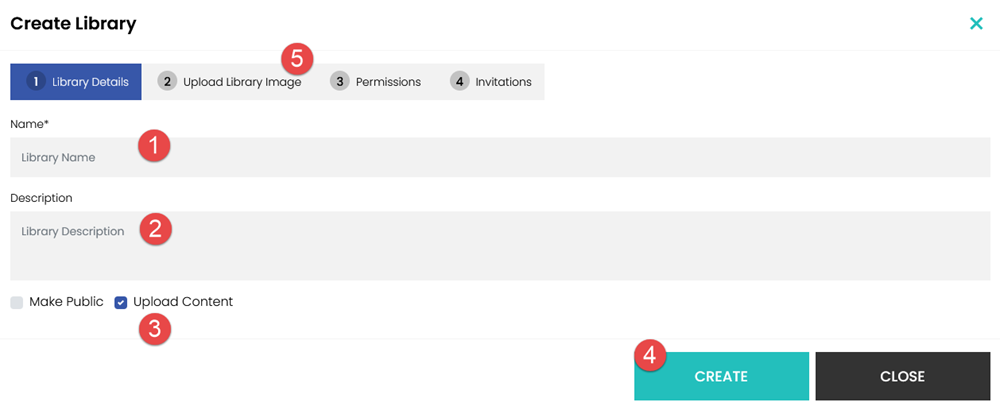
From here, click the add button (Plus icon) in the upper right to start the library creation.
- Give the new library a name - this is required.
- Optionally, give the library a description for its intent.
- Choose whether the content associated to this library should be uploaded to the cloud. This option is required if choosing to [make this library public](publiclibraries).
- The create library dialog is designed to enable quick creation. To create just one library, click 'CREATE'.
After the library is created, an image can be uploaded as a representation of that library. The image will be shown if this library is made [public](publiclibraries).
Assigning groups, users, roles and sending invitations can be done after a library is created. Libraries will not be visible to other users in the CMS desktop application until they have been granted access.
NOTE: The option to “Make Public” (Public Libraries) requires that “Upload Content” be enabled. For more details, go the Public Libraries section here.
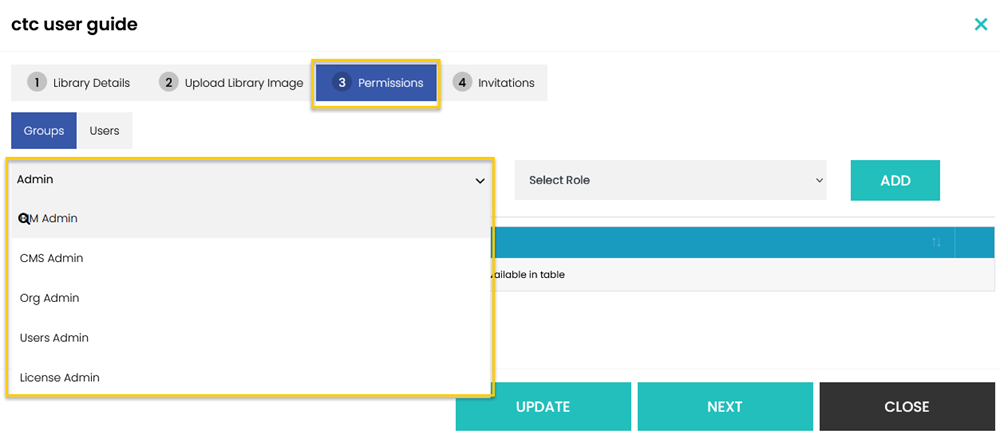
Editing and Assigning Permissions to Libraries
To grant access to an existing library, click the pencil icon at the start of the row.
Click on a step at the top of the edit form to skip to it.
On step 3 “Permissions” of the edit form, click into the search box to display the existing groups in the organization. If the name is known, start typing it to filter the list. Click on the name to choose it.
Next, choose a role to assign to the group(s) in the list. Click ADD to put it in the list. Continue these steps for each group that should be assigned.
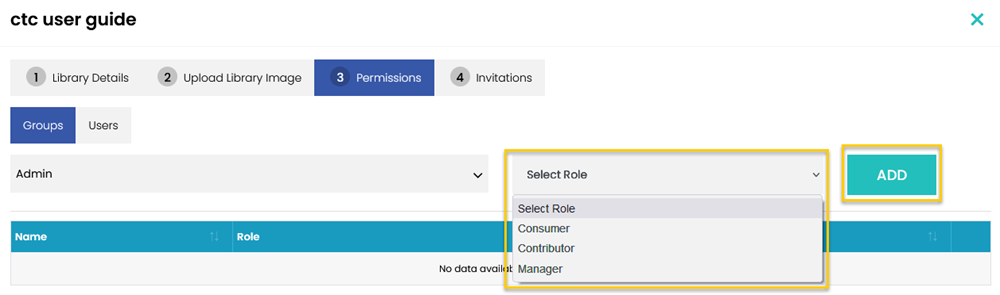
The list of groups will be shown below the search box. Groups can be removed or have their roles changed in this list.
Move on to step 4 if invited users should be granted access.
Users that are outside the organization can be granted access to libraries here. On step 4 “Invitations” of the edit form, type the full email address of the external user and select a role to apply.

When complete, click 'SAVE'.
To remove libraries, check the box at the start of the row for the library or libraries and click the trashcan icon at the top right of the list.

Note that removing a library does not affect the content, only the associations and access.